Recognising FileVault2 encryption
Apple FileVault 2 facilitates full disk encryption and requires OS X Lion or later and OS X Recovery installed on the start up drive. It is easy to detect. In the screenshot in Figure 1 File Vault 2 is activated on the Macintosh HD volume. Note that Encase indicates that all clusters on this volume are unallocated. The other partitions visible are the EFI partition and the Recovery partition.
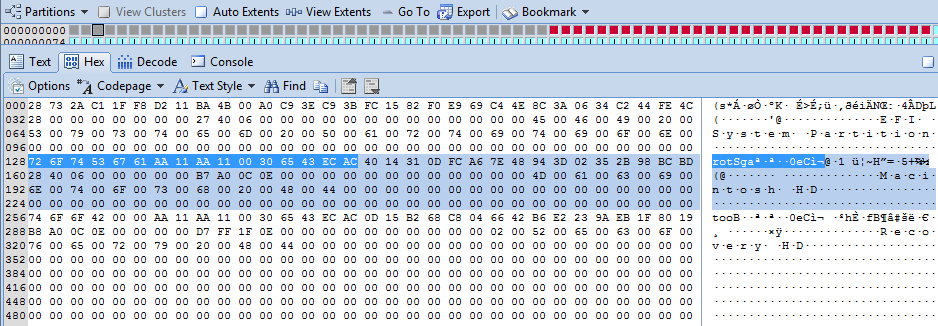
A quick examination of LBA2 (Physical Sector 2) of the Apple hard disk can establish if any of the first four partitions has FileVault2 enabled. LBA3 contains partition information for the next four partitions and so on (GPT allows up to 128 partitions). Figure 3 shows LBA2 viewed via disk view in Encase.
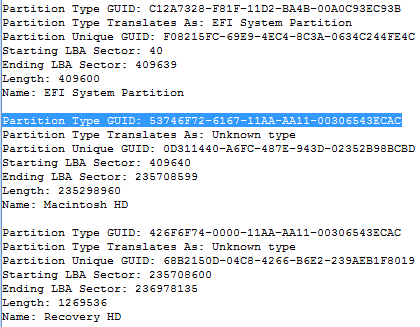
The extraction of each Partition Type GUID can also be achieved used the GPT Partition Parser Enscript. This Enscript outputs to the Console as shown in Figure 5. The FileVault2 volume entry is highlighted.
We can see the FileVault2 volume detailed in Figure 6 at /dev/disk2s2 described as a Apple_CoreStorage partition. Your Mac should ask you for the passphrase to unlock the disk as shown in Figure 7.
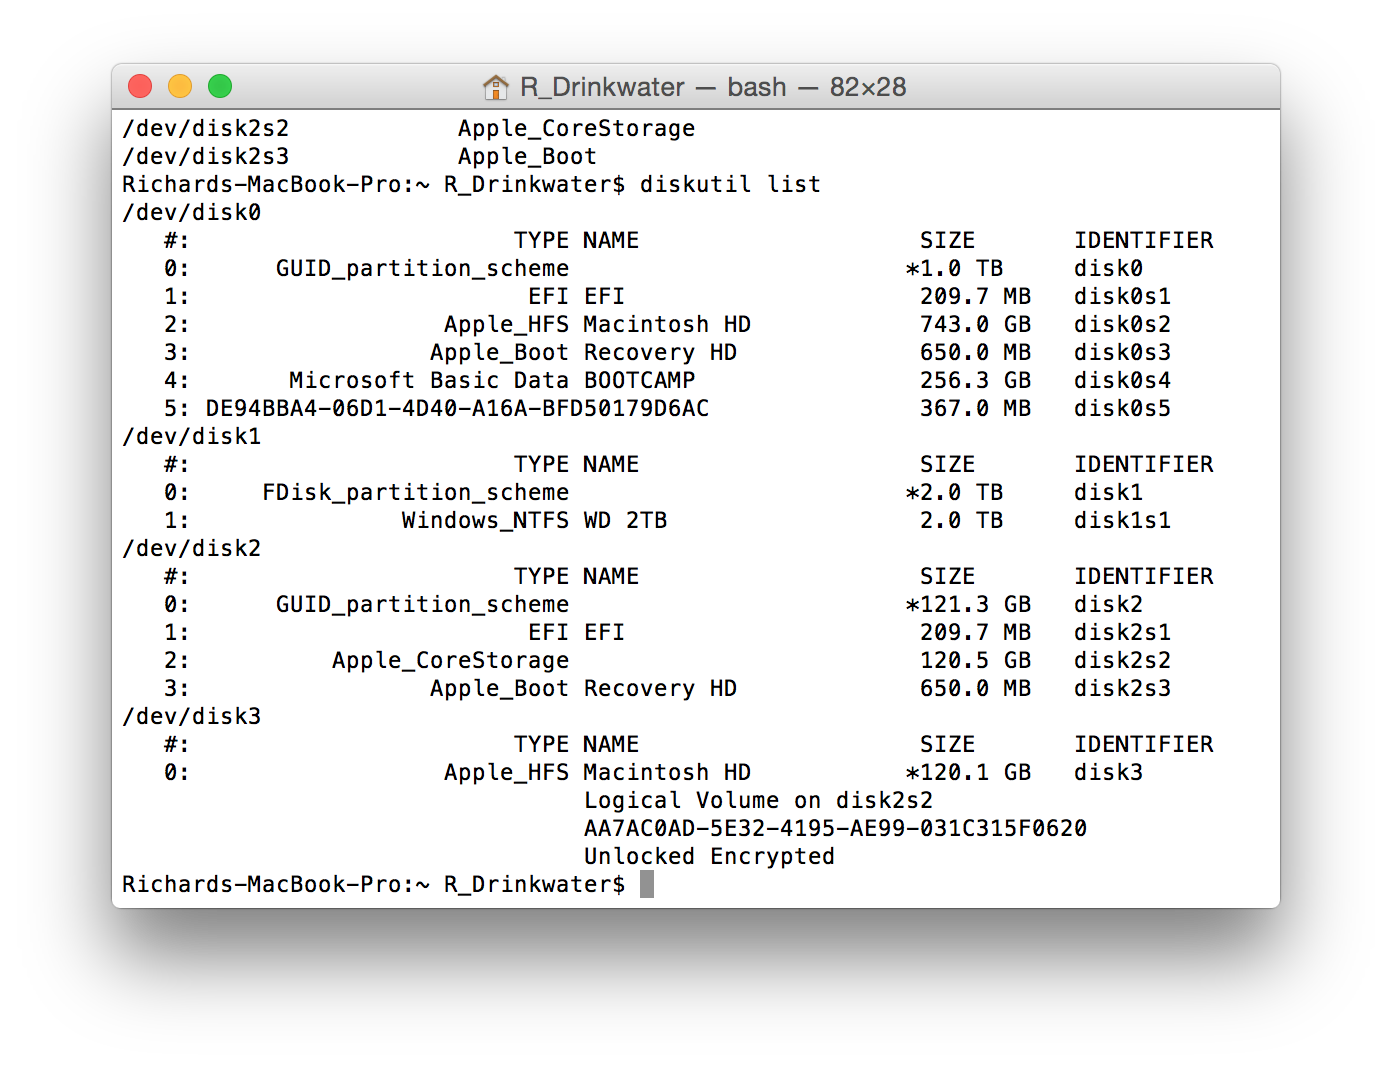
Once you have entered the passphrase, in the terminal enter the command diskutil list. We can see in Figure 8 that the disk image is listed as /dev/disk2 and the unlocked encrypted volume is listed as /dev/disk3 (disk0 is my Macs hard disk and disk1 is the external disk containing the converted DMG files).
All that's left to do now is image the unlocked encrypted volume /dev/disk3. In the terminal enter the command sudo dd bs=1m if=/dev/disk3 of=path to your output disk/output filename.dd
Once the dd image is completed you can add it into your case via the add raw image option.
Hope this helps someone.
 |
| Figure 1 |
Any Mac using FileVault2 uses the GPT partitioning scheme. In GPT LBA0 contains a protective MBR, LBA1 contains the primary GPT header and LBA2 contains the first four partition entries. Each entry is 128 bytes long and contains a Partition Type GUID, a Partition Unique GUID, the starting LBA of the partition, the ending LBA of the partition and the Partition Name.
FileVault 2 partitions all have a Partition Type GUID as shown in Figure 2. |
| Figure 2 |
A quick examination of LBA2 (Physical Sector 2) of the Apple hard disk can establish if any of the first four partitions has FileVault2 enabled. LBA3 contains partition information for the next four partitions and so on (GPT allows up to 128 partitions). Figure 3 shows LBA2 viewed via disk view in Encase.
 |
| Figure 3 |
The second 128 byte partition
entry is highlighted in light blue. The Partition Name Macintosh HD is visible from
offset 56 within the partition entry.
The first 16 bytes highlighted in darker blue detail the Partition Type
GUID but it is stored in an encoded form, therefore we can use the Decode tab
to decode it as shown in Figure 4.
 |
| Figure 4 |
The extraction of each Partition Type GUID can also be achieved used the GPT Partition Parser Enscript. This Enscript outputs to the Console as shown in Figure 5. The FileVault2 volume entry is highlighted.
 |
| Figure 5 |
Imaging FileVault2 volumes
If the passphrase used to encrypt the volume is known, it is possible to prepare a decrypted image, using the original image containing the encrypted FileVault2 volume as the source.
Firstly we need to convert the Encase evidence files containing the FileVault2 volume into a bitstream raw image. Guidance Software's Simon Key has written the Evidence File Converter enscript to do this. This script allows you to choose the Mac DMG naming scheme for the image. Store the resulting DMG files onto an external disk formatted with a file system that your Mac computer will recognise (as an aside I use the Paragon NTFS for Mac drivers so I use NTFS).
Next plug your external disk containing your DMG files into your Mac (mine is running the Yosemite OS) and launch Terminal. Enter the command hdiutil attach -nomount path_to_your_dmg_files (tip -drag the first dmg file into the terminal window to auto populate the path).
 |
| Figure 6 |
We can see the FileVault2 volume detailed in Figure 6 at /dev/disk2s2 described as a Apple_CoreStorage partition. Your Mac should ask you for the passphrase to unlock the disk as shown in Figure 7.
 |
| Figure 7 |
Once you have entered the passphrase, in the terminal enter the command diskutil list. We can see in Figure 8 that the disk image is listed as /dev/disk2 and the unlocked encrypted volume is listed as /dev/disk3 (disk0 is my Macs hard disk and disk1 is the external disk containing the converted DMG files).
 |
| Figure 8 |
All that's left to do now is image the unlocked encrypted volume /dev/disk3. In the terminal enter the command sudo dd bs=1m if=/dev/disk3 of=path to your output disk/output filename.dd
Once the dd image is completed you can add it into your case via the add raw image option.
Hope this helps someone.


